

Step 4: Implement Apple Sign-In in App (Using Flutter)
1. Add Required Dependencies
To begin integrating Sign in with Apple into your Flutter project, you’ll need to add the appropriate packages. Open the pubspec.yaml file and add the following dependency:
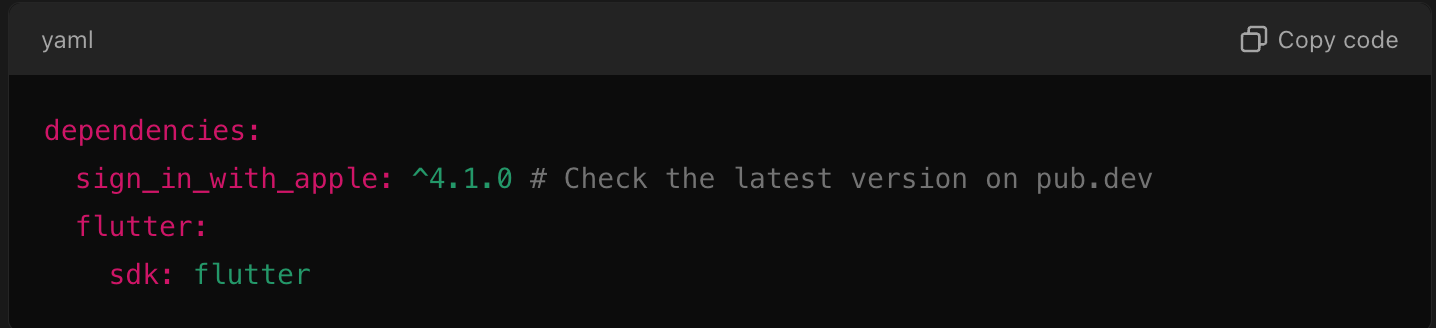
This must be in your pubspec.yaml file
Then, run:

Hit pub get in terminal/bash
This will install the sign_in_with_apple package which provides the API to handle the authentication process.
2. Configure the iOS Project for Apple Sign-In
You’ve already enabled Sign in with Apple capability in Xcode (as per the previous steps). Now, we need to make sure Flutter and Xcode are set up for the feature to work properly.
- Open the iOS folder of your Flutter app in Xcode:
- Navigate to
ios/Runner.xcworkspacein your Flutter project and open it in Xcode.
- Navigate to
- Update the Info.plist file:
- Add the following to your
Info.plistto configure the usage description and URL schemes for Apple Sign-In:
- Add the following to your

configure this in Info.plist
Make sure to replace "your.bundle.identifier" with your app’s actual bundle ID.
- Enable Keychain Sharing (Optional):
- If you want to enable seamless sign-in across multiple devices, make sure Keychain Sharing is enabled in Xcode. Go to the Signing & Capabilities tab and add Keychain Sharing.
3. Implement the Apple Sign-In Logic
Now, you need to implement the actual sign-in logic in your Flutter app using the sign_in_with_apple package.
- Import the Apple Sign-In Package:

import the package in your UI
Create the Apple Sign-In Button: You can add an Apple sign-in button to your app’s UI by using the built-in button widget:
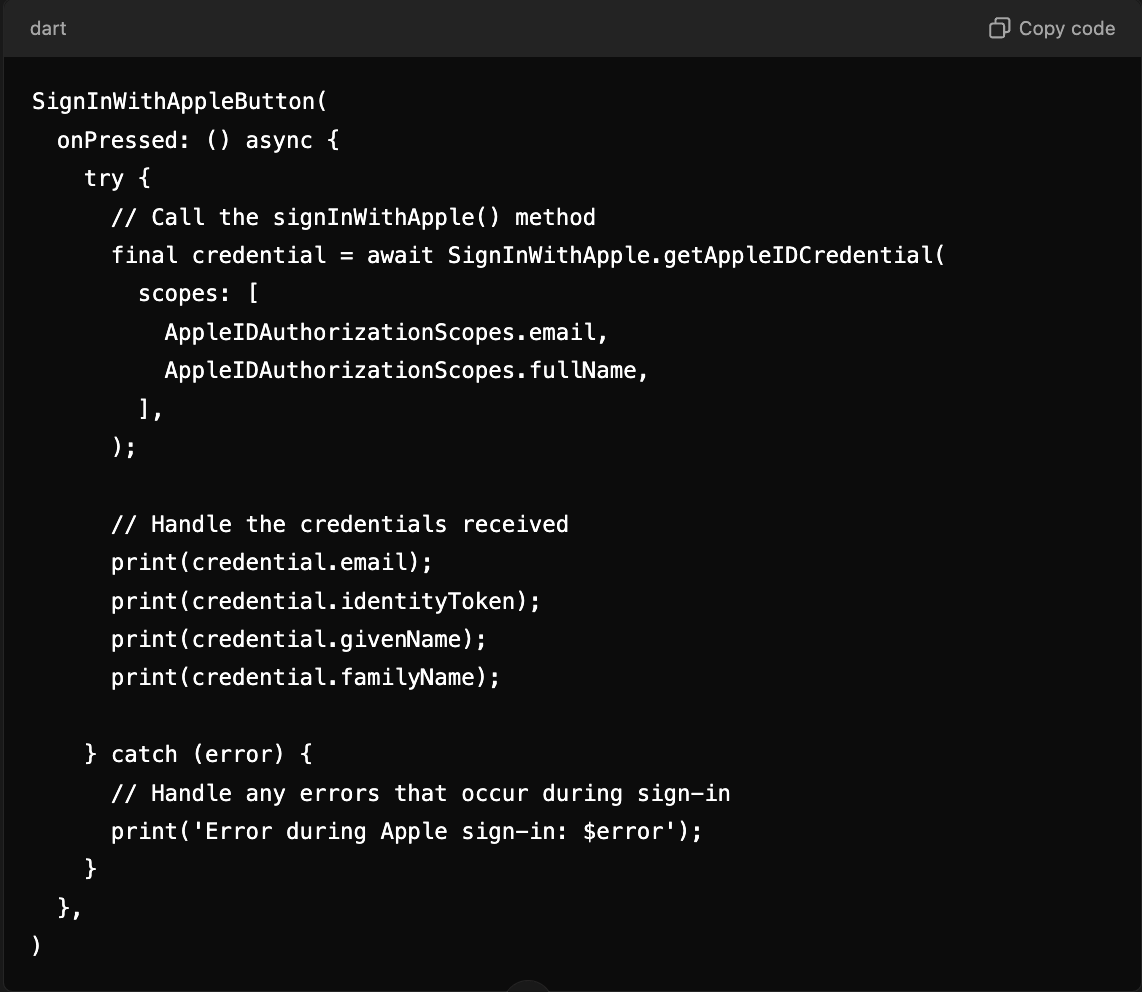
you can customize your button
Explanation of the getAppleIDCredential Method:
AppleIDAuthorizationScopes.emailandAppleIDAuthorizationScopes.fullName: These are the data fields you’re requesting from Apple. You can ask for the user's email and full name.identityToken: A JWT token that you can verify on your backend server for secure sign-in.
4. Handle the Apple Sign-In Response
You will get the user's email, identity token, and full name from Apple after a successful sign-in. Use these to authenticate the user in your app. This is what the response data looks like:
- Email: May only be available the first time the user signs in.
- Full Name: The user’s first and last name (if provided).
- Identity Token: This JWT is used to verify the user's identity and can be used with a backend server for authentication.
5. Backend(Nodejs) flow
In backend (key id, Team id, service id , private key ) must be configured (setup in backend)
Required Parameters Explanation:
- TEAM_ID (
iss): Your Apple Developer Team ID. This can be found in your Apple Developer account. - Key ID (
kid): The Key ID from the key you created in your Apple Developer account for Sign in with Apple.- The file will be named something like
AuthKey_XXXXXXXXXX.p8, whereXXXXXXXXXXis your Key ID
- The file will be named something like
- Service ID (
sub): This is your app’s Client ID, which is the Service ID you created in your Apple Developer account. - Private Key (
.p8file): This is the private key downloaded from Apple Developer when you set up the Sign in with Apple key.
5.1 Generate .p8 file(private key)
To obtain the Private Key (.p8 file) needed for generating the Client Secret for Sign in with Apple, you need to create it in your Apple Developer account. Here's how to do that step-by-step:
Steps to Get the .p8 Private Key for Sign in with Apple
5.1.1. Go to Apple Developer Account
- Log in to your Apple Developer Account.
5.1.2. Navigate to the Keys Section
- On the left-hand menu, under Certificates, Identifiers & Profiles, select Keys.
5.1.3. Create a New Key
- Click on the "+" button in the top-right corner to create a new key.
5.1.4. Configure the Key
- Name your key something descriptive, like "Sign in with Apple Key."
- Check the box next to Sign in with Apple under the Key Services section.
5.1.5. Register the Key
- Once you've enabled Sign in with Apple, click Continue and review your key information.
- Click Register to complete the process.
5.1.6. Download the Private Key (.p8 file)
- After registering, you will be prompted to download the .p8 private key file. This file is only available for download once, so make sure to save it securely (e.g., somewhere safe on your local machine or in a secure cloud storage).
- The file will be named something like
AuthKey_XXXXXXXXXX.p8, whereXXXXXXXXXXis your Key ID.
5.1.7. Make a Note of the Key ID
- As soon as the key is created, you will also receive a Key ID. Note this down because you will need it to generate the Client Secret (JWT) in your backend.
Generate the Client Secret (JWT) in backend required for Sign in with Apple
To generate the Client Secret (JWT) required for Sign in with Apple, you'll need to create a JSON Web Token (JWT) signed with your Apple Developer private key (.p8 file). This is used to authenticate your app with Apple’s servers.
Here’s a step-by-step guide, focusing on how to generate the secret key (Client Secret) in Node.js. This method works regardless of whether you're using Node.js for your backend or want to understand the process better for any language.
Prerequisites:
- Apple Developer Account: You should already have:
- App ID (Client ID).
- Private Key (.p8) file.
- Key ID and Team ID from your Apple Developer account.
- jsonwebtoken library in Node.js (or similar library in other languages).
Step-by-Step Guide:
1. Install jsonwebtoken and fs packages

2. Generate the JWT (Client Secret) in Node.js
Here’s an example of how to generate the JWT Client Secret using Node.js:
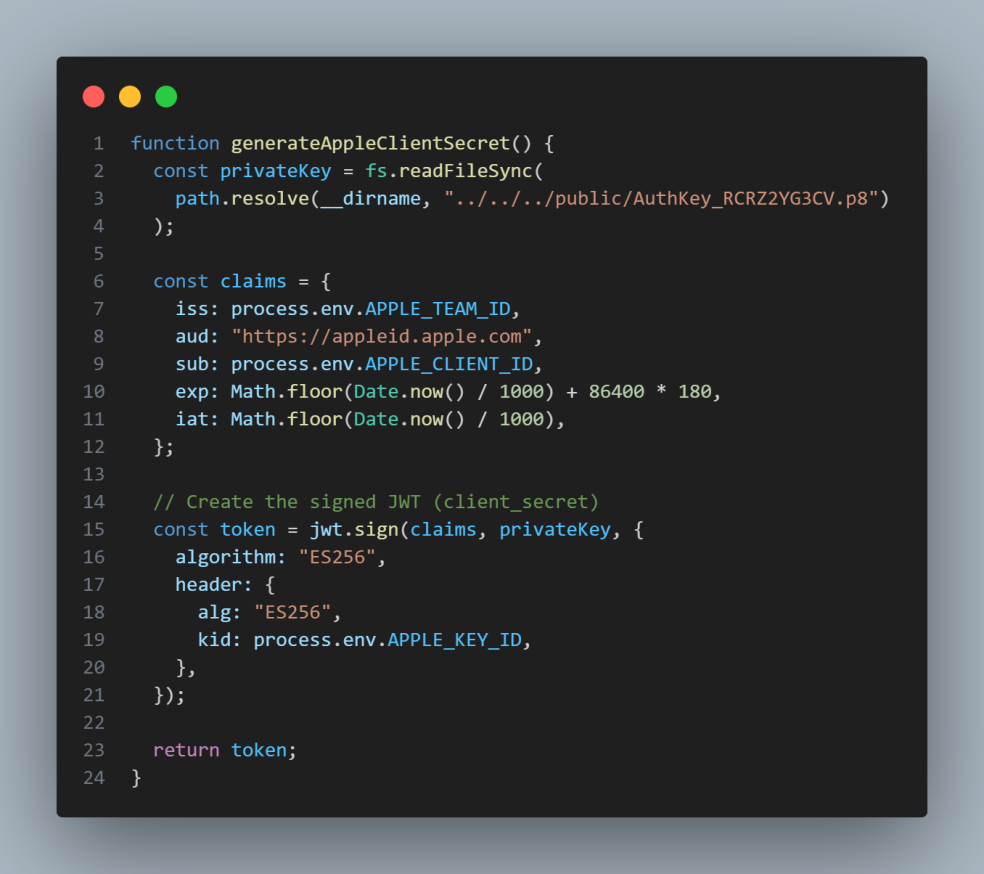
3.Required Parameters Explanation:
- TEAM_ID (
iss): Your Apple Developer Team ID. This can be found in your Apple Developer account. - Key ID (
kid): The Key ID from the key you created in your Apple Developer account for Sign in with Apple. - Service ID (
sub): This is your app’s Client ID, which is the Service ID you created in your Apple Developer account. - Private Key (
.p8file): This is the private key downloaded from Apple Developer when you set up the Sign in with Apple key.
4. JWT Fields:
iat(Issued At): The current time in seconds (Unix time).exp(Expiration): The token's expiration time. Apple recommends that this token should not last more than 6 hours (3600 seconds * 6 = 21600 seconds).aud: Apple requires this to behttps://appleid.apple.com.sub: Your Client ID (Service ID), which is the unique identifier for your app.alg: The encryption algorithm Apple uses isES256.
5. What’s Next?
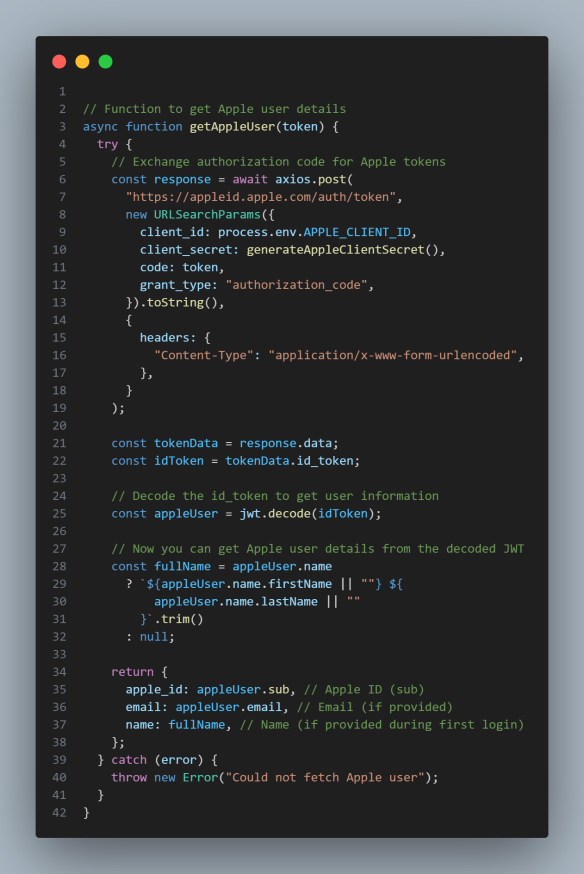
Once you’ve generated the Client Secret (JWT), your backend can now use it to communicate with Apple's servers. This token is used when exchanging the authorization code or refresh token with Apple to authenticate and validate the user.
Now Example Request:
Now you are done.
You can sign in with apple now.